
Manage your Sender IDs
You can check the Sender IDs added to your SMS-Magic account by clicking on My Sender IDs. You can filter your Sender ID List by Country, Area Code, and Sender ID type.
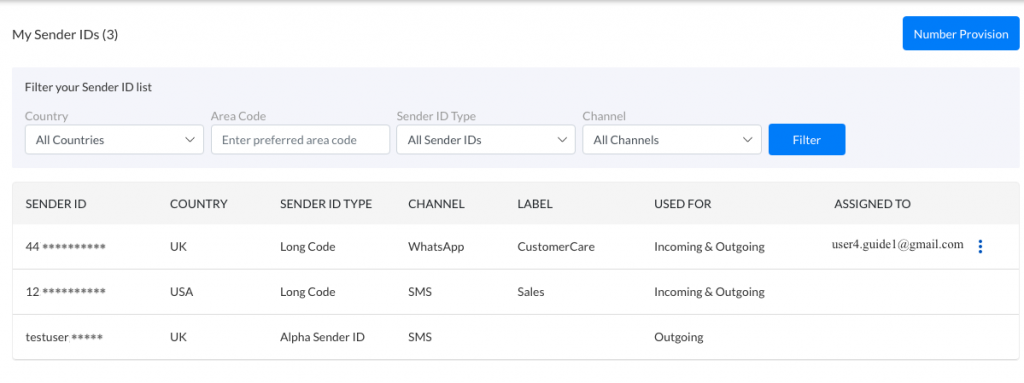
To get more details about a Sender ID, hover over the Sender ID and click on the ‘View Details’ button.
A Short Code can be shared by different accounts. The Ownership in this case will be Shared. Also, a Keyword to identify your account will be set by us. Your customers need to use that keyword to contact you on this Incoming Number. Please contact care@screen-magic.com for more details and to buy a Short Code from SMS-Magic.
Incoming and Delivery Configuration
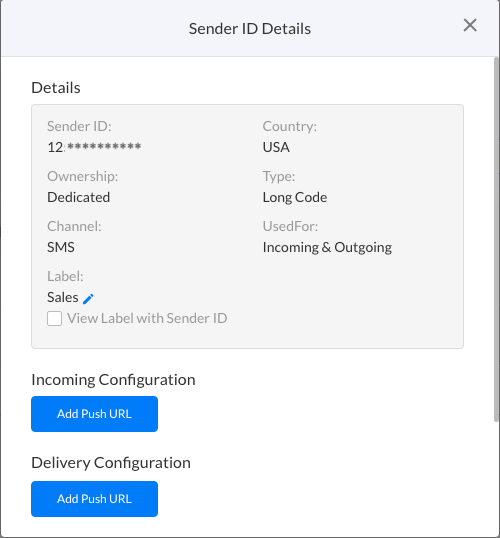
Add a whitelisted Webhook URL on which you wish to receive the Incoming messages and the Delivery Reports of the Outgoing messages.
Assign Sender ID Labels
You can assign a Label to your Sender ID to identify the purpose or users of the Sender ID while sending messages.
Follow the below steps, to assign a Label to Sender ID,
- Click on Ellipsis
icon. Click on View Details.
- Click on the Edit
icon below Label.
- Enter a Label for your Sender ID.
- Click on Save to save the Label.
- Click on Cancel to cancel the Edit action.

Once you assign a Label to a Sender ID, the Label of Sender ID will be visible to you in Sender ID selection while sending messages, as seen in the screenshot below.

If you wish to see the Sender ID along with the Label, please check the View Label with Sender ID checkbox below the Label field in Sender ID Details.

You will see the Label (Sender_ID) i.e Sales(12**********) as seen in the screenshot below for the respective Sender IDs.

Sender ID Assignment
Sender ID Assignment allows Admin users to control the access privilege of the Sender IDs that the Standard users can have. Standard users can make use of the assigned Sender ID to send and receive messages, view the message history for that Sender ID.
Admin Users can assign a Sender ID to one or more Standard Users. All Admin users by default have access to all the Sender IDs.
Follow the below steps to assign a Sender ID to Standard users-
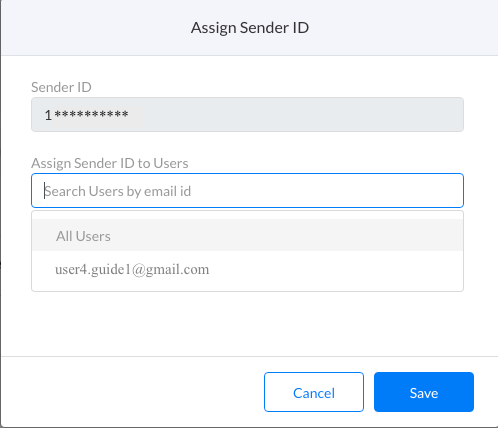
- Hover over the required Sender ID and click on the Eliipsis
- Check if the selected Sender ID is seen under the Sender ID field.
- Enter the email address of the Standard User you wish to assign the Sender ID to. Select the user from the dropdown.
- The user will get added to the list below. Add more standard users if required.
- You can also select the ‘All Users’ option if you wish to allow all users to have access to the Sender ID.
- Verify the Users list and click on the ‘Save’ button.
- Click on the ‘Cancel’ button, to cancel the operation and close the dialog box.
Manage Shared Sender IDs
Admin user can configure the owner of the incoming conversation initiated by a customer.
The default configuration for Manage Shared Sender IDs is –
- If Sender ID is assigned to only one Standard User then the default owner is that Standard User
- If Sender ID is assigned to multiple Standard Users then the default owner is the Admin User
- If all the Users in the account are Admin then the default owner is the Admin User who created the SMS-Magic account
The default setting can be overridden to configure the required user to receive the messages in a new incoming conversation initiated by a customer. From Standard users who have the Sender ID assigned to them and all the Admin Users in the account, anyone can be made the owner of such Customer Initiated new Incoming conversations.
To change the default setting of Manage Shared Sender ID, follow the below steps –
- Go to Settings -> SMS Services
- Click on My Sender IDs
- Hover on any Sender ID that you want to configure
- Click on the Ellipsis Menu
and then click on Manage Shared Sender ID
- All the Admin Users and the Standard Users who are assigned this Sender ID will be shown in the dropdown as shown below:
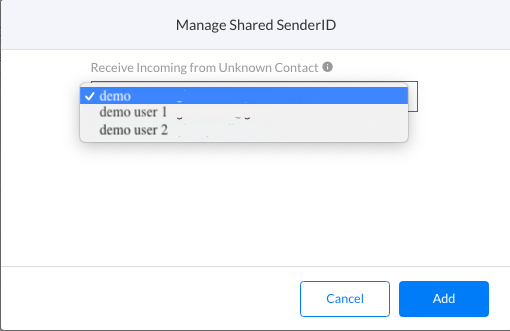
- As shown in the above screenshot, demo user 1 and demo user 2 are standard users. The demo user is the admin user. This Sender ID is assigned to demo user 1 and demo user 2. So, the default value was set to the demo user.
- You can change this demo user 1, if you want demo user 1 to receive all the new incoming conversation initiated by a customer on this Sender ID.
This setting ensures that the conversations initiated by your customers appear in the Inbox of the users who will be conversing with them.